
Ever tried to upload a photo to a website form, only to get hit with “file too large” right when you’re in a rush? Or waited forever for a video to upload because the file size was massive? Compressing images and videos solves both problems, and you genuinely don’t need expensive software to do it — a handful of free online tools can shrink file sizes in seconds without noticeably hurting quality.
This guide covers the best free online compressor tools for images and videos, how they compare, and how to pick the right one depending on what you’re compressing and why.
What Is File Compression?
File compression reduces the size of an image or video file by removing unnecessary data or optimizing how the file is encoded, while keeping the visual quality as close to the original as possible. For example, a blogger uploading a 5 MB photo to their website could compress it down to under 500 KB, dramatically speeding up their page load time with barely any visible difference in image quality.
Why File Compression Matters in 2026
Page Speed Directly Affects Rankings and User Experience
Search engines factor page load speed into rankings, and large, uncompressed images are one of the most common causes of slow websites. Compression keeps pages fast without sacrificing visual quality.
Who Benefits Most
Bloggers and website owners use compression to speed up page loads and improve SEO. Content creators use it to meet upload size limits on social platforms. Everyday users use it to free up phone storage or send files over email without hitting attachment limits.
Best Free Online Compressor Tools (Reviewed)
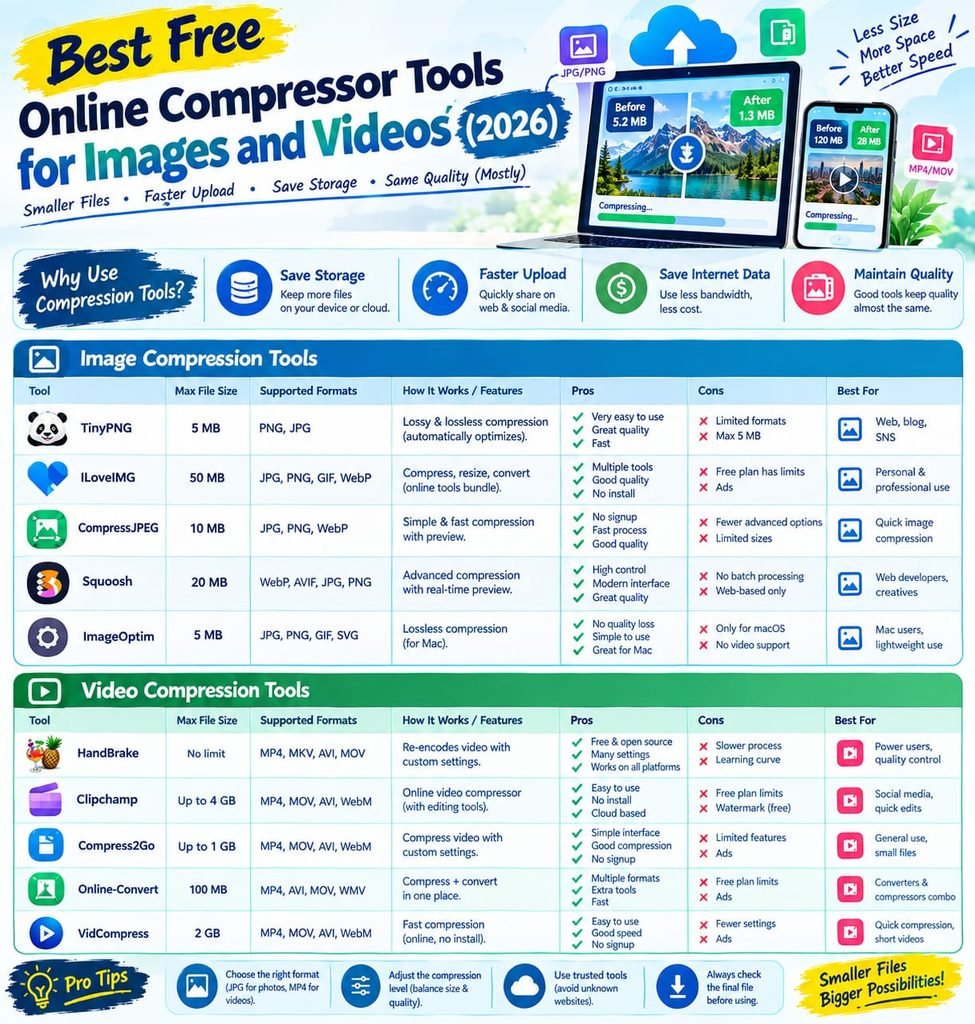
1. TinyPNG / TinyJPG
Features: Smart lossy compression for PNG and JPEG images, drag-and-drop interface, bulk upload support. Pros: Excellent balance of file size reduction and retained image quality. Cons: Free tier limits the number of images per batch upload. Price: Free (with batch limits); paid plans and API access for higher volume. Best for: Compressing website images without a noticeable quality drop.
2. Squoosh (by Google)
Features: Browser-based image compression with a side-by-side before/after quality comparison slider. Pros: Gives you fine-grained manual control over compression settings. Cons: More technical than one-click tools — better for users who want to fine-tune results. Price: Free. Best for: Users who want precise control over the quality-vs-size tradeoff.
3. Compressor.io
Features: Supports both lossy and lossless compression for JPEG, PNG, GIF, and SVG files. Pros: Flexible format support beyond just standard photo formats. Cons: Larger files may take longer to process than dedicated tools like TinyPNG. Price: Free. Best for: Compressing a wider variety of image formats, including SVGs.
4. HandBrake
Features: Free, open-source video compression and format conversion software (desktop, not browser-based). Pros: Extremely powerful with professional-level control over video encoding settings. Cons: Steeper learning curve for first-time users; requires downloading software. Price: Free. Best for: Users needing serious, high-quality video compression without cost.
5. FreeConvert Video Compressor
Features: Browser-based video compression with adjustable target file size and quality settings. Pros: Simple, no-install option for quick video compression. Cons: Free tier has file size and daily conversion limits. Price: Free (with limits); paid plans for larger files and more conversions. Best for: Quick, in-browser video compression without downloading software.
6. Clideo Video Compressor
Features: Online video compressor with straightforward drag-and-drop upload and format options. Pros: Very beginner-friendly interface. Cons: Free tier adds a watermark or limits export quality on longer videos. Price: Free (with limits); paid plans remove restrictions. Best for: Casual users compressing short video clips occasionally.
7. ImageOptim (Mac)
Features: Drag-and-drop lossless image compression built specifically for Mac. Pros: Simple, offline, and completely free with no limits. Cons: Mac-only, so it’s not an option for Windows users. Price: Free. Best for: Mac users wanting fast, offline, lossless compression.
8. Optimizilla
Features: JPEG and PNG compression with a slider to manually balance quality versus file size per image. Pros: Good visual feedback for fine-tuning each image individually. Cons: Batch limit on the number of images per session. Price: Free. Best for: Fine-tuning compression settings on a small batch of images.
9. VEED.io Video Compressor
Features: Online video compressor bundled with basic editing tools like trimming and subtitles. Pros: Useful if you want light editing alongside compression in one tool. Cons: Free tier includes a watermark on exported videos. Price: Free (watermarked); paid plans remove watermark and limits. Best for: Users wanting quick edits and compression together.
10. Kraken.io
Features: Image compression with both lossy and lossless options, plus a developer-friendly API. Pros: Strong option for developers needing automated compression in a workflow. Cons: Full features and higher limits require a paid plan. Price: Free tier with limits; paid plans for API access and higher volume. Best for: Developers wanting to automate image compression within an app or website.
How to Choose the Right Tool
Factor 1: Image vs. Video Needs
Dedicated image compressors like TinyPNG or Squoosh won’t help with video files — for video, you’ll need a tool like HandBrake or FreeConvert instead.
Factor 2: One-Click Simplicity vs. Manual Control
If you just want a fast, automatic result, TinyPNG or Clideo are the simplest options. If you want to manually balance quality and file size yourself, Squoosh or Optimizilla give you that control.
Step-by-Step: How to Compress a File for Free
Step 1: Choose the Right Tool for Your File Type
Pick an image-specific tool for photos or a video-specific tool for clips — using the wrong type of tool won’t give good results.
Step 2: Upload and Adjust Settings
Upload your file and, if the tool allows it, adjust the quality slider to find the right balance between file size and visual quality.
Step 3: Download and Compare
Download the compressed version and compare it against the original to make sure the quality drop isn’t noticeable for your intended use.
Comparison Table
| Tool | Price | Best Feature | Rating |
|---|---|---|---|
| TinyPNG/TinyJPG | Free (limited) / paid | Smart lossy compression | 4.7/5 |
| Squoosh | Free | Manual quality control | 4.6/5 |
| Compressor.io | Free | Broad format support | 4.4/5 |
| HandBrake | Free | Professional video encoding | 4.6/5 |
| FreeConvert | Free (limited) / paid | Simple browser video compression | 4.3/5 |
| Clideo | Free (limited) / paid | Beginner-friendly interface | 4.1/5 |
| ImageOptim | Free (Mac only) | Offline lossless compression | 4.5/5 |
| Optimizilla | Free | Per-image manual sliders | 4.3/5 |
| VEED.io | Free (watermark) / paid | Compression + light editing | 4.2/5 |
| Kraken.io | Free (limited) / paid | Developer API access | 4.3/5 |
Common Mistakes to Avoid
- Over-compressing images. Pushing compression too far can introduce visible artifacts — always preview before publishing.
- Using the wrong format. JPEG works well for photos, while PNG is better for graphics with transparency; using the wrong one can hurt both size and quality.
- Compressing already-compressed files repeatedly. Re-compressing the same file multiple times can degrade quality unnecessarily.
- Forgetting video bitrate settings. For video, resolution isn’t the only factor — bitrate has a major impact on both file size and quality.
Pros and Cons Summary
Pros: Speeds up website load times and improves SEO, makes file sharing and uploading easier and faster, most tools are genuinely free for everyday use, browser-based options require no software installation.
Cons: Free tiers often cap file size or batch quantity, video compression free tiers are generally more limited than image tools, some tools add a watermark to free video exports, over-compression can visibly hurt quality if not checked carefully.
Conclusion
Compressing your images and videos takes just a minute or two but can noticeably speed up your website, save phone storage, and make sharing files far less frustrating. Pick a tool suited to your file type — TinyPNG or Squoosh for images, HandBrake or FreeConvert for video — and make compression a normal step before you upload or publish, not an afterthought.